Running Angular PWA with .NET Core WebApi like an offline desktop application
- Posted by Muthukumar Dharmar
- Categories Angular PWA
- Date August 8, 2020
This article is for the developers who are already familiar with using the Angular framework and .NET Core technology. If you are new to Angular PWA, please refer to the angular docs to learn how to set up and run Angular PWAs.
Progressive Web Apps are built using Html, CSS & JavaScript. Since this a web-based application it can run across devices and operating systems. PWA’s are a great choice especially when our solution should run cross-platform(windows, android & iOS).
Technologies used in this article,
- Angular framework for Front-End
- .NET Core for backend WebAPI.
Usually, web applications are deployed in web servers like IIS, Apache, Nginx, etc., right 🙂 … In this article, we will be deploying our web application as a windows service and setup our front-end as a PWA, so that we can have an App like user experience.
Requirement
Our requirement is to build an application that should run cross-platform, targeting various levels of customers. In other words, we are going to build an app that we provide as a SaaS on cloud (or) a distributable package.
Target Customers
- An individual customer going to use it as a personal app from their mobile devices (Android / iOS).
- Medium to Large scale organizations is going to use this app as a cloud-based SaaS service.
- Small Shops going to use this app as an offline desktop application.
Let's begin with a short demo
Here we are running our Angular Progressive Web Application like a desktop app, you might wonder how are we running our web API without IIS right 🙂 , that’s the beauty of .NET Core platform which allows us to run the web API as a windows service.
Projects

ems-api is a .Net Core WebAPI project that uses EntityFrameworkCore to communicate with our MySql database
ems-web is our font-end that was created using the Angular CLI tool.
Let's start with Front-End changes

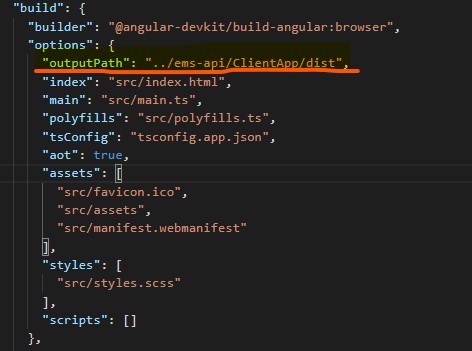
In order to host our Angular PWA along with the WebApi, we should copy the build output to the folder inside WebApi, for this demo we will be using the ClientApp\dist folder for the same.
We can try any of these two steps:
- Update the outputPath in our angular.json file, so the build will always be placed under the Client\dist folder inside WebApi. (we will use this approach)
- Or, write a post-build event in our WebApi project to copy the angular output to our ClientApp\dist folder, for this approach we must make sure we already generated the build output in our angular project.
Then enable service worker in your angular project, for more details please refer the angular docs
- ng add @angular/pwa –project *project-name*
- ng build –prod
- http-server -p 8080 -c-1 ../ems-api/ClientApp/dist
Backend Api changes
Install and configure the below listed NuGet packages in our WebApi project.

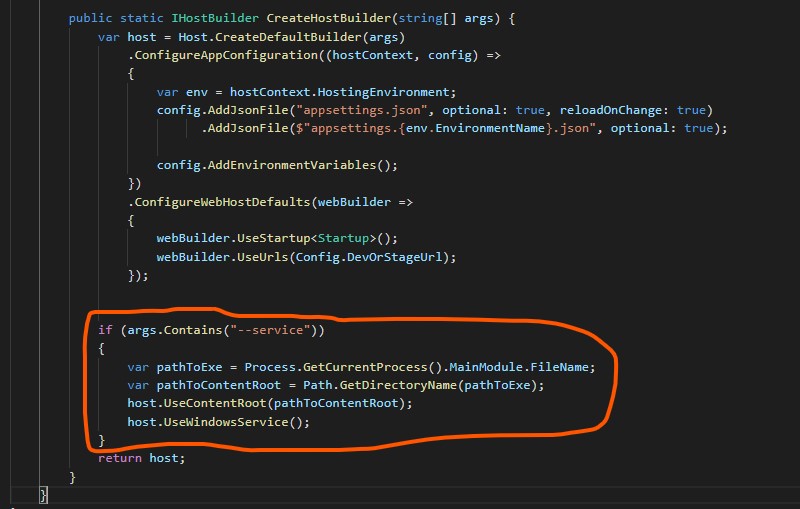
Let’s update the program.cs file so that our WebApi will run as Windows Service when we pass an argument as –service

When we run our .net core application as windows service it won’t consider the application root as the content root path, hence we have to dynamically set the content root path using the extension method UseContentRoot() as mentioned above.
Now, let’s update our startup.cs file so that it serves our angular application.
Let’s add these statements inside the ConfigureServices method so that the Asp.NET Core SPA middleware can serve the static files from the ClientApp/dist folder.


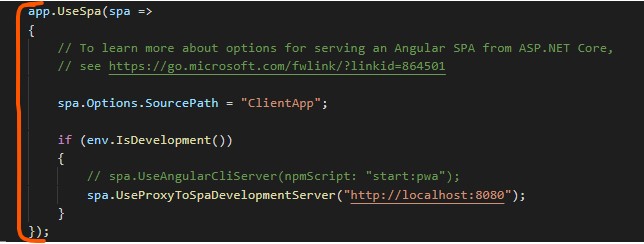
Then include these statements inside the Configure method.
If you notice we have a proxy configuration for a front-end development environment. So that we can simply start our angular app and the backend WebApi separately and it will communicate without any issues.
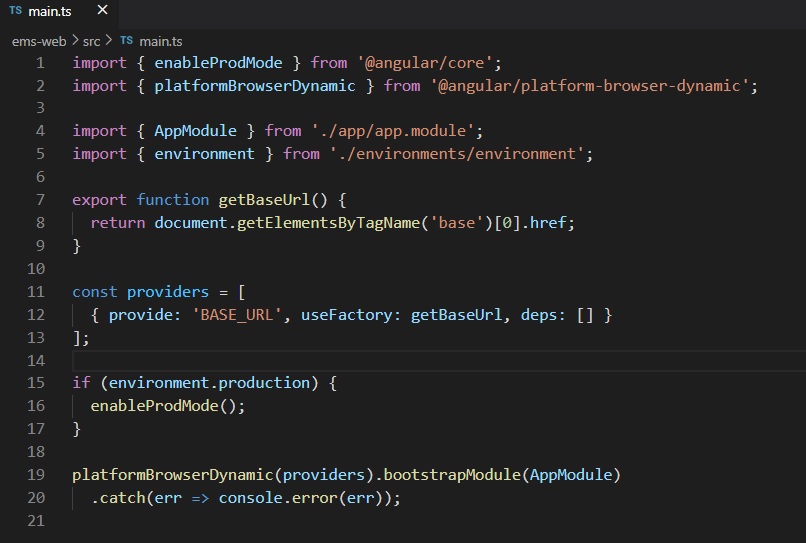
During development we run both projects separately, backend at port 5001 and our front end in port 8080, our configuration in API smartly redirect the front-end requests to the proxy Url. But we didn’t do any changes in front-end for point API requests to port 5001, lets see how to handle it in front-end.
Of course, some of you have an answer to keeping a variable in the environment. ts and point the same in HTTP requests, right!… cool 🙂
But this is a different approach, we will update the main.ts file so that it will automatically update the base URL in environment.ts. Even if we happened to change the port in the API project, this will automatically work and avoid unnecessary confusion & code changes.


Yes, we are done setting up all the configuration to execute our Angular PWA app as windows service. Now, we just need to publish our WebApi and run it as a windows service.
For installation/uninstallation of windows service, we will use the below commands from the SC tool.
Installation commands

Uninstall commands

Hope you guys have enjoined this article 🙂
You may wonder, why can’t we create our project using Visual Studio project creation templates, so that it can set up one single project where angular front-end is already integrated with WebAPI, right!…
It’s up to you, I preferred to keep the front-end and backend project separately for easy maintenance. Even if we decide to go with different technology for backend, we don’t have to spend time extracting the angular out from the WebApi.
Tag:Angular PWA, desktop, PWA, standalone
Over 17 yrs of experience in the IT industry.
Skill Set: Angular, RxJS Reactive Programming, AspNet WebApi, WCF, WPF, Azure, etc.,
